
We love Korean food in this household. I am always surprised at how expensive the little jars in the grocery store are and to tell the truth, not very good. Years ago I had several Korean neighbors that taught me how to make kimchi. There are as many variations of kimchi as there are people in Korea I think, as each family has their own special secret blend/recipe. This is how I make it at my house. I make it with available ingredients from my grocery store. Sometimes when I am feeling fancy, I make a special trip to the Asian store and get Asian pear and other ingredients to make it fancy. But, for every day or quick pretty decent kimchi, this works in a flash. That doesn't mean that the initial ingredients for the Korean pepper and such does not require a special trip to the Asian market, but once you have that, you are good to go for a very long time. Let's get started shall we?
2 large fresh Chinese (Nappa) cabbage, dark green outer leaves removed
1 cup sea salt (available cheap at your Asian grocer and without iodine, this is important)
3 heaping tbsp rice starch powder (regular kind) or 1-2 heaping tbsp glutinous rice starch.
2 cups water
2-3 large to medium carrots or 4 medium to small carrots.
1/2 cup Korean chilli powder – aka gochugaru (not flakes, look for it at your local Korean grocery store)
1 cup Korean chili flakes
1/2 cup fish sauce, or ½-1 teaspoon of preserved shrimp, or 6 whole oysters finely chopped (your choice)
1 tbsp white sugar
2 bunches or spring onions, washed sliced 5-10 cloves of garlic, crushed (or to taste, I like a lot so I use an entire head of garlic)
1 inch knob of ginger, grated
1-2 teaspoons of toasted sesame oil (optional)

Chop cabbage into about 1 1/2 to 2 inch slices so that it is bite size. Place in large pot and mix with the 1 cup of salt. Make sure it is sea salt and not the iodized salt from the grocery store. I purchase the natural style sea salt for very cheap in 10 lb bags at my Asian grocers. As a matter of fact, that is all we use for salt now. It has no flow agents or other added ingredients. It is much tastier and it works a lot better in kimchi. Once this is mixed together place to one side for about 1/2 hour or so while you prepare the rest of the ingredients.
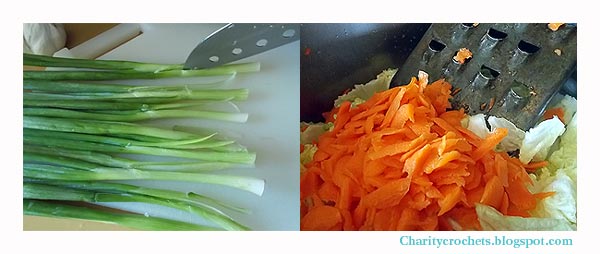
Chop up some scallions into 1 inch pieces and put to one side. Be sure to slice them down the middle on the heads so you don't end up with big pieces. Set them to one side in a bowl for later. You can either grate the carrot or you can cut them into fine matchsticks. I used this giant grater that was my grandmothers and is very old. Just use whatever is available. However, a regular size cheese grater is too fine. You want some texture. Add the carrots to the salted cabbage and mix around with your hands.

In a sauce pan whisk your 2 cups of water with the rice flour. Heat until very thick and bubbly. It should be almost like a pudding in thickness. Set to one side and let this cool while you prepare the next step.

You will need to choose which type of fish type ingredient you need to make this. I am using the shrimp paste today. Do not fret, it will not make this fishy tasting but it goes a long way in aiding the flavor. Some use about 1/2 cup of fish sauce and others use about 1/2 dozen of chopped up fresh raw oysters and I commonly use some sort of shrimp paste. (image 1)
Next I put an entire head of garlic that has been peeled and the one inch hunk of ginger root into my mini food processor. If you don't have one, don't worry, you can just chop and mince finely with your knife or in a blender will work too. Next I add about 1/2 to 1 teaspoon of the shrimp paste. (image 2) and then I add just a little bit of the rice flour mixture that I boiled to this to aid in chopping and blending the garlic and other ingredients like the sugar, etc.. Give it a good whirl until well blended. (image 3).
I like to use 2 types of chili pepper. It comes crushed and also powdered. They are the same thing, except one is finer ground. I like to use both as the finer adds color but the flakes add texture and interest. Add a little of both or just the powdered or just the flakes if that is all you have on hand. I gave a guideline in the recipe as to how much to add, but really this is to your taste. Some years the pepper flakes and powder is more mild than others. I would use caution and keep adding to your tastes. This pepper is not super hot so don't be afraid of it. I purchase this at the Asian grocery. You MUST use the Korean pepper flakes as if you use something else it will ruin your kimchi. This is a different pepper flake than the type you purchase in the supermarket for putting on pizza for instance, just as the powder is not the same thing as paprika. (image 4)
Add the chili powder to the rice flour paste and whisk in with the other ingredients you just pulverized (image 5 & 6). Set to one side.

After about 1/2 hour to an hour has passed you will notice that your really full big pot of salted cabbage has wilted and reduced down to about 1/2 the height. You will need to wash the cabbage to get the excess salt out. Fill your big pot with cold water and swish around like you are doing laundry by hand (image 1) and then drain (image 2). You will need to do this about 3 times to get all the excess salt out. Take a piece of the cabbage and taste it. It should be slightly salty but not salty like a potato chip. After it has drained transfer back into the pot and add about 2/3 of the hot pepper paste that you just made and about 1/2 - 2/3 of the sliced green onion. (image 3) Mix with your hand until well incorporated and then taste. At this stage if you removed too much of the salt you might add some, and this is also the stage to add some optional sesame oil and then mix well with your hands again. (image 4) and then put into a container and press down well with your hands until some liquid comes to the top to cover the leaves. (image 5). You don't want the cabbage exposed while it ferments or it can get moldy. This is very important. Set out on the counter in a covered container for a few days to let it ferment. Congratulations!!! You just made kimchi. After a day or two move to the fridge and eat it with rice or your favorite Korean dish. The longer you keep it the more sour it becomes. Once it becomes too sour to eat, don't throw it out.. You can make kimchi jiggae (kimchi stew) from it.

Bonus Recipe: Remember that little bit of left over kimchi paste and onion from making the above recipe? Well... Here is the bonus recipe. Traditionally this uses pickling cucumbers but I did not have any. I have English seedless cucumber so that is what I am using for demonstration purposes. If using the baby cukes just leave them whole and slice down the center like in image one. If using a big seedless cucumber like I did, just cut into about 3 inch slices and then cut an X like shown above. Do not cut all the way down. Cut down to about 1/2 inch remaining to keep the cucumber intact. Then spoon some of the sea salt into the slices and let sit in a bowl and drain out (image 2). Wash the salt out after about an hour or so (image 3)
Take the remaining scallions and paste and mix together. Stuff the inside of the cucumbers with this mixture. Place in a container and then massage any extra left over paste on the outsides of the cucumbers.

Sprinkle the top of the cucumbers with some toasted sesame seeds. Place this in the fridge for a day or two and then eat.
Now you never need to purchase store bought kimchi again and these are made from easily available ingredients without having to hunt down Asian pears, etc. each time you make it. Once you make the initial purchase of the pepper flakes and sea salt, etc. You will be making kimchi often.
Bon Appetite!
Until next time........xxxxxxxxxxx


