Showing posts with label cooking. Show all posts

Sunday, April 14, 2013

Kimchi Recipe Time.


We love Korean food in this household.  I am always surprised at how expensive the little jars in the grocery store are and to tell the truth, not very good.  Years ago I had several Korean neighbors that taught me how to make kimchi.  There are as many variations of kimchi as there are people in Korea I think, as each family has their own special secret blend/recipe.  This is how I make it at my house.  I make it with available ingredients from my grocery store.  Sometimes when I am feeling fancy, I make a special trip to the Asian store and get Asian pear and other ingredients to make it fancy.  But, for every day or quick pretty decent kimchi, this works in a flash.  That doesn't mean that the initial ingredients for the Korean pepper and such does not require a special trip to the Asian market, but once you have that, you are good to go for a very long time.    Let's get started shall we?  

Ingredients

2 large fresh Chinese (Nappa) cabbage, dark green outer leaves removed
1 cup sea salt (available cheap at your Asian grocer and without iodine, this is important)
3 heaping tbsp rice starch powder (regular kind) or 1-2 heaping tbsp glutinous rice starch.
2 cups water
2-3 large to medium carrots or 4 medium to small carrots.
1/2 cup Korean chilli powder – aka gochugaru (not flakes, look for it at your local Korean grocery store)
1 cup Korean chili flakes
1/2 cup fish sauce, or ½-1 teaspoon of preserved shrimp, or 6 whole oysters finely chopped (your choice)
1 tbsp white sugar
2 bunches or spring onions, washed sliced 5-10 cloves of garlic, crushed (or to taste, I like a lot so I use an entire head of garlic)
1 inch knob of ginger, grated
1-2 teaspoons of toasted sesame oil (optional)


Chop cabbage into about 1 1/2 to 2 inch slices so that it is bite size.  Place in large pot and mix with the 1 cup of salt.  Make sure it is sea salt and not the iodized salt from the grocery store.  I purchase the natural style sea salt for very cheap in 10 lb bags at my Asian grocers.  As a matter of fact, that is all we use for salt now.  It has no flow agents or other added ingredients.  It is much tastier and it works a lot better in kimchi.  Once this is mixed together place to one side for about 1/2 hour or so while you prepare the rest of the ingredients.
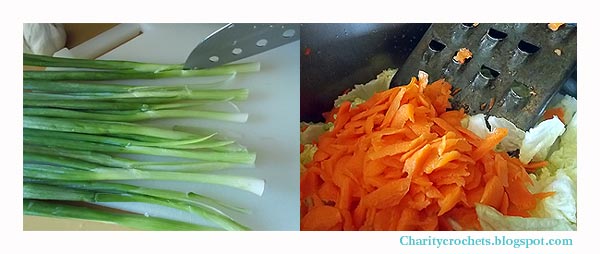

Chop up some scallions into 1 inch pieces and put to one side.  Be sure to slice them down the middle on the heads so you don't end up with big pieces. Set them to one side in a bowl for later.   You can either grate the carrot or you can cut them into fine matchsticks.  I used this giant grater that was my grandmothers and is very old.  Just use whatever is available.  However, a regular size cheese grater is too fine.  You want some texture.   Add the carrots to the salted cabbage and mix around with your hands. 


In a sauce pan whisk your 2 cups of water with the rice flour.  Heat until very thick and bubbly.  It should be almost like a pudding in thickness.  Set to one side and let this cool while you prepare the next step.


You will need to choose which type of fish type ingredient you need to make this.  I am using the shrimp paste today.  Do not fret, it will not make this fishy tasting but it goes a long way in aiding the flavor.  Some use about 1/2 cup of fish sauce and others use about 1/2 dozen of chopped up fresh raw oysters and I commonly use some sort of shrimp paste.  (image 1)

Next I put an entire head of garlic that has been peeled and the one inch hunk of ginger root into my mini food processor.  If you don't have one, don't worry, you can just chop and mince finely with your knife or in a blender will work too.  Next I add about 1/2 to 1 teaspoon of the shrimp paste. (image 2) and then I add just a little bit of the rice flour mixture that I boiled to this to aid in chopping and blending the garlic and other ingredients like the sugar, etc..  Give it a good whirl until well blended. (image 3).

I like to use 2 types of chili pepper.  It comes crushed and also powdered.  They are the same thing, except one is finer ground.  I like to use both as the finer adds color but the flakes add texture and interest.  Add a little of both or just the powdered or just the flakes if that is all you have on hand.  I gave a guideline in the recipe as to how much to add, but really this is to your taste.  Some years the pepper flakes and powder is more mild than others.  I would use caution and keep adding to your tastes.  This pepper is not super hot so don't be afraid of it.  I purchase this at the Asian grocery.  You MUST use the Korean pepper flakes as if you use something else it will ruin your kimchi.  This is a different pepper flake than the type you purchase in the supermarket for putting on pizza for instance, just as the powder is not the same thing as paprika.  (image 4)

Add the chili powder to the rice flour paste and whisk in with the other ingredients you just pulverized (image 5 & 6).  Set to one side.


After about 1/2 hour to an hour has passed you will notice that your really full big pot of salted cabbage has wilted and reduced down to about 1/2 the height.  You will need to wash the cabbage to get the excess salt out.  Fill your big pot with cold water and swish around like you are doing laundry by hand (image 1) and then drain (image 2).  You will need to do this about 3 times to get all the excess salt out.  Take a piece of the cabbage and taste it.  It should be slightly salty but not salty like a potato chip.   After it has drained transfer back into the pot and add about 2/3 of the hot pepper paste that you just made and about 1/2 - 2/3 of the sliced green onion. (image 3)  Mix with your hand until well incorporated and then taste.  At this stage if you removed too much of the salt you might add some, and this is also the stage to add some optional sesame oil and then mix well with your hands again. (image 4)  and then put into a container and press down well with your hands until some liquid comes to the top to cover the leaves. (image 5).  You don't want the cabbage exposed while it ferments or it can get moldy.  This is very important.  Set out on the counter in a covered container for a few days to let it ferment.  Congratulations!!!  You just made kimchi.  After a day or two move to the fridge and eat it with rice or your favorite Korean dish.   The longer you keep it the more sour it becomes.  Once it becomes too sour to eat, don't throw it out.. You can make kimchi jiggae (kimchi stew) from it.  


Bonus Recipe:  Remember that little bit of left over kimchi paste and onion from making the above recipe?  Well... Here is the bonus recipe.  Traditionally this uses pickling cucumbers but I did not have any.  I have English seedless cucumber so that is what I am using for demonstration purposes.   If using the baby cukes just leave them whole and slice down the center like in image one.  If using a big seedless cucumber like I did, just cut into about 3 inch slices and then cut an X like shown above.  Do not cut all the way down.  Cut down to about 1/2 inch remaining to keep the cucumber intact.  Then spoon some of the sea salt into the slices and let sit in a bowl and drain out (image 2).  Wash the salt out after about an hour or so (image 3)

Take the remaining scallions and paste and mix together.  Stuff the inside of the cucumbers with this mixture. Place in a container and then massage any extra left over paste on the outsides of the cucumbers. 


Sprinkle the top of the cucumbers with some toasted sesame seeds.  Place this in the fridge for a day or two and then eat.  

Now you never need to purchase store bought kimchi again and these are made from easily available ingredients without having to hunt down Asian pears, etc. each time you make it.  Once you make the initial purchase of the pepper flakes and sea salt, etc.  You will be making kimchi often.  

Bon Appetite!  

Until next time........xxxxxxxxxxx


Friday, April 12, 2013

There goes the diet! (and how to fry oysters)


Have you ever noticed that as soon as you think about dieting, then something comes into your house to challenge that plan?  Case in point, world famous extra small Hood Canal Oysters!  We like them fried, that is not too friendly to the waistline along with tarter sauce.  Of course I had to have blue cheese dressing on my salad.  Oh well... I will try harder today.  The thing is, we will not purchase oysters any month that does not contain an "R" in it.  That means no oysters for May, June, July or August.  They are soft and mushy and spawning those months. This is the last month that we get to enjoy them until next September so I am not going to feel too guilty.  If I had the time, I would just go out to the canal myself and sit on the beach with some lemons and my trusty oyster shucking knife and eat them raw on the half shell.  I have pleasant memories of doing that more times than I can count.   If I had time to kill, I would be out there right now!

The easiest way to fry oysters is just to take some flour and add your favorite seasoning in one bowl, and some egg wash (just a beaten egg with a Tablespoon or so of water) in another.  I then dredge in the flour seasoning mixture, then into the egg, back into the flour and into a pan of hot oil (but not too hot).  I just pan fry on both sides until golden brown which is just about 2-3 minutes on each side.  That's it!  


Last night after eating I thought a quick 3 mile walk around my favorite forest paths would help settle some of the guilt from eating fried foods.  Look at this root ball clump and how nature is re-claiming it.  When giant douglas fir trees come down in a wind storm, they have very tall root balls taller than you and me together standing on each other's shoulders.  


The wonderful thing about living in a rain forest is some of the cool things I witness while walking.  Look at the thick moss on this tree and from that, ferns begin to grow on the tree itself.  It is quite beautiful to look at don't you think?


And there are many types of moss.  Look at this long and hair moss that grows from the tree limbs here.  Isn't it beautiful?


While I was out walking this trillium was just asking to have it's photo snapped.  The sun came out for a little bit and this trillium was growing right in the middle of a split tree trunk that had 3 trees growing up and they were all mossy and green.  Smack in the center was this trillium and the sun came beaming through the forest cover to illuminate this one flower.  It was more beautiful in real life. 


Wild woodland violets are starting to bloom on the forest floor and cover it with a happy blanket of little yellow flowers.  I imagine being a little tiny woodland fairy or something frolicking about when I view them. They sure are a sight and just make me feel happy inside.


A sure sign that spring is here, is not the weather because it is stormy and cold with sun breaks... but instead, passing by the ball fields are groups of various baseball teams practicing for their summer leagues.  It is rather fun to sit and watch the kids clumsily play and miss catching the ball and miss hitting it with the bat when it is their turn to go up to bat.  I am sure with practice they will get better. 

Today I hope to continue to work on my crochet project so I can get that put up soon.

Until next time.........xxxxxxxxxxx


Thursday, April 11, 2013

Pillow decorating and happiness over the simple things in life


A good Thursday to all of you.  I hope all is well out in the blogging world.  My spirits are returning and I am getting back into enjoying the every day things in life again.  My decision to disconnect from social media like Facebook for a while was the right decision.  With the way of the world right now, there was just too much negative attention on all that is wrong with the world.  I want to concentrate on all that is right in the world instead...  And there are so many things that are right in the world.  

I have been playing with the flower pattern that Lucy at Attic 24 designed.  She designed it for a wall hanging but I have been playing with it to instead turn it into motifs for my pillow that will go on my bed.  I will be making them all different sizes and lengths and kind of random as far as colors go from the scrap basket.  Originally I didn't think I would do this and wanted to hold off until some of the books I ordered recently from Amazon.com came, but I am too impatient and decided to play with her design and instead of using it as a wall hanging, turn it into a motif.  I am picturing this with various size flowers and maybe some crocheted butterflies or something to turn it into a fun and festive garden pillow.  

The weather here has been dreadful and the nice warm blast we had a week or two ago with sunshine has gone into hiding.  This is perfect weather for completing such projects.


I have decided to think about things that make me happy!  I was out front with my kitty cat and watching him guard his post on the front steps.  His head moved like clockwork from side to side like watching a tennis match.  This really made me chuckle... He was so intense with his stare.  He is a great guard and takes his job so seriously.


Of course all that guarding of the property makes for a very tired and lazy afternoon nap.  I just want to curl up and sleep next to him.  It is really hard to resist going back to bed when you see a cute and adorable kitty cat all snuggled up.


My new salt mill on the right that I got for Easter from a dear friend, to match the pepper mill on the left that she purchased for Christmas for me makes me giddy.  Are they not the cutest salt and pepper mills you ever did see?  Every time I cook I think of her now.  I have them filled with whole fresh pepper corns and big grains of sea salts.  It really does making cooking a lot of fun.  I will think of Lora every time I cook.  We go way back in our friendship.  She is the friend that we were together and joined at the hip during our teen years.  Can you believe that even as dramatic drama filled teenage girls, we never once had a fight!  I can't ever remember not getting along with her ever..  A friend like that is a rare gem and a rare find.  I am very blessed not only for these salt and pepper mills but more for what they symbolize.  Life is good!


With all the cold rainy weather, hot soup has been on the menu.  I really enjoyed curling up and hooking on my pillow after enjoying a nice big bowl of French onion soup au gratin.  It is such a simple thing but oh so good and oh so comforting.  Yesterday was absolutely stormy in the morning and I already have a giant pot of clam chowder on the menu to make soon.  I purchased all the ingredients at Costco yesterday for that.  


An apple pie goes a long ways in brightening the mood around here.  There is nothing like a hot slice of pie with some tea.  I wanted to tell you all that when you roll out your pie dough and there are little bits of scraps left not to waste them!  Instead roll them out, and use a cookie cutter to make decorative shapes to place on top.  If there is enough flour on the cutting board when you roll it out, then you will be able to "glue" your shapes to the pie and decorate it.  Simply just dip your finger in some ice water and dab on the back of the shape before placing on the pie.  I then brush the pie with some melted butter and sprinkle with some sugar to give it a golden color, which makes the shapes stand out that much more.   A pretty pie makes me very happy.  

All in all, life is good.  I hope these images helped to lift your spirits as much as they have mine.  Sometimes it is just those little simple things in life that keeps me happy.  I don't wish to live in a cave and block out the world completely.  I do like to know world events and what is going on and I am actually very active with the process of democracy, but a little of that goes a long way.  I can only take so much of it and it does not serve me well to sit all day and see reminders of it and concentrate on "we are doomed, the world is one messed up place".   I like to get my news for the day and then move on.  I think one can drive themselves insane by sitting and watching the news all day long with the doom and gloom.  Well, that was what was happening to me with reading Facebook because link after link of news stories and strong opinions on world events.  It was just too much doom and gloom collectively and I was facing burn out.  I am enjoying my vacation time away from it and once again settled into the happy little things in life.  

Life is great if you can just look around you and enjoy the bounty and be grateful for what you have no matter how simple it is.  They say, a person is not grateful because they are happy, but happy because they are grateful.  I find this to be very true!  

So stop what you are doing, look around and pick 5 things you are grateful for right now, no matter how simple it is... it goes a long way in feeling inner peace and happiness.  It works for me :) 

Until next time... xxxxxxxxx


Sunday, March 3, 2013

Old Fashioned Rootbeer Soda Tutorial.


Have you ever wanted to know how to make your very own homemade rootbeer the old fashioned way?  Or how about cream soda or any other flavor?  The way they did way back then before forced carbonation and made simply without all the added chemicals, and preservatives and high fructose corn syrup, etc.  

Recipe:  20 cups of water
2 1/2 cups of sugar
2 Tablespoons of Rootbeer extract (available at your local brew shop)
1 Tablespoon of Vanilla extract
1/8 teaspoon champagne yeast (available at your local brew shop, and do not whatever you do, DO NOT use bread yeast like some recipes ask for.  It will make it taste terrible and like, well.... bread and yeasty.  Champagne yeast does not alter the flavor.  A small $1 packet will last for many batches.  I keep it stored in the freezer in a ziplock bag once it is opened, and keep using it till it is gone)


Begin by putting the sugar into a big pot along with the water.  Put on the stove and bring to a boil.  Once it reaches a boil, I put a lid on it to help keep the water from evaporating out.  Once it is boiling, set the timer on your stove for 10 minutes and let it roll.  

While it is going, scrub out the bottles you want to use.  If you are a beginner at this, I highly suggest using plastic liter bottles with a screw on lid instead of the beer bottles I am using.  The reason for this is because with the plastic bottles once they are carbonated you will be able to tell by squeezing the bottle and if it is firm, it is probably ready... but I am getting ahead of myself here.   You will need to sanitize your bottles.  You can soak your bottles in a sink full of water along with a couple tablespoons of bleach for about 1/2 hour, and rinse several times with hot hot water... The other option is to use something called "Star San" as bleach can leave behind a nasty flavor and you can re-introduce bacteria with your rinse water.  I mix  1/2 teaspoon of star san in 1 quart of water  (A batch of star san will last several weeks so you can keep re-using it for more batches.) .  I put some of it in a spray bottle and the rest into my nifty bottle washer.  You place the bottle on it, and pump it down a few times and it sprays the sanitizing solution into the bottle and drains back into the bowl below.  Otherwise you will need to pour some in, shake it around, and pour back out into a container to re-use. Once I have sanitized all my bottles I place them into a bucket to drain until I need them to fill later. 


Once your water has boiled for 10 minutes, place it in a sink full of cold water to help it cool faster.  Fill the sink first so no un-sterile water contaminates the pot by splashing in while filling the sink.  This will help it cool faster (yay! thermodynamics). Take a sanitized measuring cup (I usually spray everything with the sanitizing solution a few minutes before hand and keep on a clean and sanitized plate) and dip out about 1/2 cup of the sugar water.  Once it reaches about 80 degrees (check with a sanitized thermometer) add 1/8 teaspoon of the champagne yeast and wait a few minutes and give it a good stir with a sanitized spoon.  Once the pot of sugar water cools to 80 degrees pitch the yeast solution into it and add 2 Tablespoons of rootbeer extract ( I like gnome brand!) and 1 Tablespoon of vanilla extract.  Give this a stir with a long sanitized spoon being careful not to touch the rootbeer with your hands.  


Usually I would use a brewers bucket with a spout and racking cane and hose, but for this tutorial I used equipment that the average person would have in their kitchen which is a pitcher and a funnel.  Make sure they are sanitized and fill the bottles using the funnel and pitcher.  You will need to re-fill the pitcher several times.  I take the pot out of the sink and dry off with a towel on the outside before filling the pitcher to ensure no bacteria filled water droplets end up in your rootbeer contaminating it. Fill your bottles and leave about an inch head space.  I cap with a capper, and bottle caps for beer bottles that have been soaked in the sanitizing solution first, and after I give the capped bottles a good rinse and dry off with a towel,  I label them.  I just use simple masking tape and a sharpie marker.  I usually end up with 12 - 13 bottles of soda, depending on how much I spill when filling the bottles. 

I realize most people will not have a fancy beer bottle capper and until you have been doing this for a while, I highly suggest just using some recycled plastic liter bottles with screw on caps.  Let them sit out at room temp for a few days.  In my house it is usually about 3-4 days.  The reason why I suggest for the beginner to use plastic bottles is that once the yeast does it's job, you will be able to squeeze the bottle with your hand to tell if it is firm.  If it is firm and carbonated, then you can put it in the fridge to crash the yeast.  At my house since I use beer bottles, I wait 3 days and open one bottle and drink it to see if it is carbonated enough.  Sometimes I need to let it go another day or so.  

Now the important part!  DO NOT store these at room temp once they reach carbonation.  The yeast will continue to eat the sugars and build more carbon dioxide (the fizzy stuff) and will eventually build so much pressure they will become bottle bombs and explode and make a huge mess in your kitchen (or where you store them!).  

Once the soda is at a good carbonation level you will need to crash the yeast.  This is where your ice box is key.  Put the whole batch into your fridge and let sit for a day or two.  The yeast will get too cold to work anymore and sink to the bottom of the bottle and go to sleep and stop building CO2 and pressure.  When you serve your soda, just pour into a glass leaving behind about 1/2 inch of soda where all the yeast is contained.


Congratulations!  You just made some homemade rootbeer.  If you want to make cream soda, just use vanilla extract from your spice cupboard (2-3 Tablespoons depending on taste, just play with it).  You can go to your local brew shop and they have a plethora of old fashioned flavors you can use too.  

Now wasn't that simple?  You will never again need to buy soda again and you can have it natural style without all the additives and nasty chemicals like in commercial soda.  A bottle of flavoring lasts for several batches.  2 Tablespoons is 1 ounce.  Depending on the size of the bottle extract you buy, you can make quite a few batches.   If you are really adventurous you can even boil down things like blackberries and filter out the seeds and go completely natural with your soda flavors.  Just have fun and experiment with your own creativity.  You can boil some grated ginger root along with some lemon rinds and juice for ginger lemon too.  If you purchase flavoring for baking, you can even use those flavoring extracts.  The sky is the limit! 

Now go forth and have some soda making fun!  You don't need one of those kits to make soda that uses chemical filled syrups and CO2 chargers.  All you need is some flavoring, either homemade (do a google search for homemade ginger ale for instance) or you can purchase old fashioned flavor extracts from a brew supply place, or go to amazon.com and buy some.  

Just have fun!  And I hope you enjoy your rootbeer!  


Wednesday, February 27, 2013

Mid Week and 4 simple things that make me happy.


This time of year I never know if I will be in the house crocheting through a storm or outside enjoying the promise of spring.  For the last week, I have made a lot of progress on the scrappy ripple blanket.  We had a few days where it was stormy and cold, and raining.   This photo I took when the winds were so bad, I was certain we would lose power around here.  I made a hot cup of coffee and got out my hook and ripple blanket.  It was so relaxing sitting and hooking and listening to the storm and rain outside.


Here is my blanket about 1/2 of the way finished.  I have made a lot of progress since I took this photo.  It is using up little tiny balls of yarn and if you look real close there are 4 shades of blue, 4 shades of yellow and on and on with several more shades of green, pink, purple, turquoise, and on and on.. My basket of yarn is getting to be pretty empty at this point.  I have been looking at yarn on several web sites already to purchase, and replenish the supply.  In the little town that I live, most the stores that sell acrylic yarn for blankets are very often more times than not out of many colors of yarn.  This means frequent trips to the store until eventually you have enough colors to make something.  Either that, or you must go to the 2 yarn stores which have very beautiful yarn that is cost prohibitive to make large projects like this.  I love those yarn stores and hope to buy enough to make a wool jacket or something for myself some day.  Until then, I am buying budget friendly acrylic yarns for my blankets. 


Soon enough though, the weather cleared and I was able to peg out my first load of laundry this year.  You have no idea how much this excites me!  This means that soon I will be shutting off the tumble dryer until next fall again.  I love going out in the mornings with a load of laundry and listening to the birds sing while I peg out the washing.  It is one of those simple moments in the day where I get to slow down and reflect and meditate on all the wonders in the universe.  I can't imagine life  without a clothesline.  One of these days I will invest in some nice steel T posts and make the old fashioned type lines that string across the yard.  Call me weird if you want, but I like to watch the clothes blowing in the breeze. 


One of the simple pleasures in life is a wonderful and creamy batch of homemade rootbeer.  It is simple to make and ever so tasty. I always add vanilla to give it that creamy flavor as well.  No preservatives and no high fructose corn syrup.  I will need to make another post sometime with some recipes and sterilization techniques on how to make this.  It is made the old fashioned way with champagne yeast for carbonation.  

I hope you dear reader, are having a wonderful week so far.  I am off to tidy floors and do the mid week cleaning as tomorrow is rubbish collection day.  This means that today I clean out the fridge and clean the house and rummage about to make sure the recycling bins and the garbage cans are filled all the way up before first thing in the morning.  If I look hard, there is always enough clutter that needs to be cleared someplace in the house.  I never seem to have a problem finding enough to put out there, it is just finding the inspiration to de-clutter a closet or whatever.  If the TV show hoarders were on every morning, I bet you my house would be spotless at all times.  Now that show is encouragement and inspiring to clean!  I see an hour of that and go crazy cleaning and tossing things out.  

Until next time xxxxxxxxxxxxxxx


Tuesday, February 26, 2013

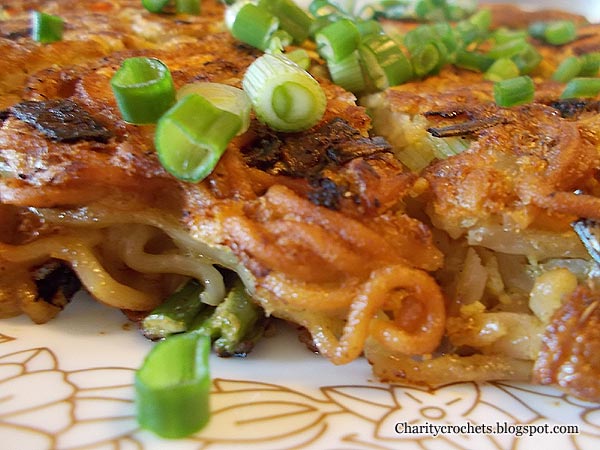
Curried Ramen Pancake Recipe


I am going to show you something here, that is a little different but very good.  If you have ever had a Saigon Pancake, you will really love this.  I created this one day when I was hungry for a Saigon Pancake but did not have the rice flour or the coconut milk on hand to make one.  Desperate, I reached into the cupboard and pulled out some ramen.  That day, the curried ramen pancake was born.  It is very delicious and most people have these ingredients on hand.  It sounds a bit strange but you will be pleasantly surprised.  I have tried making it without the curry and without the sesame oil and something was seriously lacking.  You need these two ingredients to make this flavorful.  You can use whatever protein and vegetable combo you want.  You can make it with a mixture of pork and shrimp and add lots of bean sprouts, or whatever you like.  Have fun and don't restrict yourself. 


You will need 2 eggs, a package of your favorite ramen flavor, some vegetable oil, some sesame oil, and some curry powder.  You also will need about 2 cups worth of your favorite protein source and some vegetables.  I have shrimp, scallions, carrots and celery here because that is what was in the fridge today. 


Crack open two eggs into a bowl and add the seasoning packet from your ramen directly to the eggs.  Take about 1/2 teaspoon of curry powder and whisk this together and set aside. In the mean time cook your veggies and meat in the frying pan you will use a little later in about a Tablespoon of vegetable oil.  (A little less if you have a teflon pan).  Just enough to keep things from sticking.  In another pan boil your noodles in water without the seasoning package until done.  I ended up cooking the shrimp but left the green onion out and added directly to the egg mixture in the next step.  I did not want my scallions to become overcooked. 


Drain your noodles and add the vegetables to the egg and seasonings.  Then add your noodles and give a good stir.  Put a little sesame oil in the pan and more vegetable oil if needed to keep this mixture from sticking.  You don't need very much.  You do not want this to be greasy.  Cook this on medium to medium high heat.  You basically want it high enough to brown the pancake but not too hot or the center will not cook.  Not too cool or the pancake will absorb the grease.  Depending on your stove, just between medium high and medium heat.  


While it is cooking cover the pan so that it traps the heat and cooks the inside of the pancake.  After about 4-5 minutes it should be golden brown on one side (lift a corner of it with a spatula) and it should be pretty firm and hold it's shape when you shake the pan around.  This means it is ready to flip.  Place a plate over the frying pan and hold on tight.  Flip it onto a plate.  Be very careful as this is hot.  Then look to see if the pan is still coated with oil, if not adjust the oil in the pan again with sesame oil.  Slide the pancake from the plate back into the pan so you can cook the other side.   After both sides are cooked through just slide onto a plate.


I cut it in wedges with a pizza cutter and serve this way.  It can be shared as an appetizer or as a meal.  I like to top it with fresh cut up green onions.  

It is very tasty, quick and economical.  This is just another way to enjoy some ramen.  It can be served wrapped up in lettuce leaves if you desire and dipped in a dipping sauce.  Here is the recipe for a basic dipping sauce.  
Enjoy! 


Thursday, February 21, 2013

Hoddeok Korean Sweet Pancake Recipe

I have been on a Korean food kick again around here.  Today I made Hoddeok.  It is a wonderful street food served from carts in Korea.  It is served hot and gooey fresh from the frying pan.  I love this so much!  It is not overly sweet but it has just the right amount of sweetness to it.  I make another version that is a bit different than the fabulous Emily Kim at maangchi.com    She uses walnuts and her version is fabulous.  If you have never been to her site, please go and visit it.  I used to spend a fortune at the Korean market on pre-made foods because I did not know how to make some of my favorites.  She took the mystery out of it and it has been a love affair ever since I discovered her wonderful site.


Here is one that I have ripped open so you can see the hot sweet filling waiting inside as you bit into these pancakes.  There is nothing better than eating one.

The recipe follows:  

1 Tablespoon of yeast (or one packet is fine) added to 1 cup of warm water and 2 Tablespoons of sugar, and 1 Tablespoon of vegetable oil.  In another bowl put 2 cups of all purpose flour and 1/2 teaspoon of salt.  Whisk the dry ingredients together and after about 5 or so minutes after the yeast is activated and bubbling, mix the dough with your hands until all the ingredients are incorporated.  Cover with plastic wrap until doubled in size.

Filling:  Mix equal parts of chunky peanut butter and brown sugar. I use Adams natural style peanut butter.  If you use a thicker type you might need a little more to make the filling so it is not too crumbly  (I just eyeball this but you want about a cup of filling)  then add 1-2 teaspoons of cinnamon to taste.  You want the dough/filling to be a bit crumbly but still moist enough that you can form a ball when you pinch it together.  


Punch the dough down and then dump onto a floured surface.  I just pat it down with my hands and use a knife to cut into 8 pieces.  I find it easiest to just take a knife and cut it like a pie.  


Flatten a piece of dough and then take about a Tablespoon or two of the filling and place into the center.


Pinch the dough to form a ball of dough with the filling inside.


This is a little addition I came up with on my own.  Hoddeok traditionally does not have sesame seeds on the outside but I like the toasted sesame flavor added to this and I find that having the sesame seeds on the dough helps keep the spatula from sticking to these when you flatten them, when you fry them. 


Place in a frying pan with oil on about medium.  You want the oil to be hot enough to fry them and not absorb into the dough, but you don't want them to fry too quickly as they need time to cook through so the filling gets hot and gooey.  I put them in the frying pan and flatten right away with my spatula.  Try to flatten them until they are very flat and about 5-6 inches wide.  Some people place the dough in to fry, and do not flatten them until they flip them, and then turn them back over to re-fry the edges.  Whichever is easiest for you.  I like to flatten them right away.  The sesame seeds help you to do it this way, otherwise the spatula will most likely stick to your dough ball.  


Fry until golden brown on both sides.  Remove from oil and place on a paper towel.  Repeat this process with all of the dough pieces. 


I usually get one started in the frying pan and continue to make the stuffed dough balls while one is frying to save time. 


Serve them while they are piping hot!  These are so delicious!  Give them a try...  You will be hooked on the hoddeok.  (Pronounced Hoe-Dook! or Hoe-Took!  It is kind like half T and D in the middle there).  

Have fun and enjoy! 


Monday, February 4, 2013

Worlds Easiest Spinach Pie Tutorial & Recipe

This is the worlds easiest spinach pie!  I came up with this originally because I purchase big bags of spinach at Costco on a regular basis.  We love spinach at our house.  I needed to use some of it up one day and came up with this.


Make your favorite pie crust recipe.  I find the one on the back of the Crisco container to be a good one.  In this case I measured 1 cup of flour, 1/2 teaspoon of salt, 1/3 cup of shortening into the food processor and gave it a few quick pulses.  Then add about 1/4 cup of ice cold water and give a few more pulses until it comes together.  Do not whir it in the processor until the dough forms a ball.  It will still be crumbly but moist, and it will form a ball when you take it out of the food processor.  You don't want to overwork the dough but mix it just enough to come together.  If you over work the dough, it will be tough.  You want tender dough.  

Roll out your dough and place into your pie dish.  Go ahead and prick the bottom with a fork.  This prevents air bubbles from forming under the dough while it bakes.

Set the pie crust to one side.  Now here comes the really easy part for the filling.  

I use fresh spinach so I steam the washed spinach in a pot.  Just rinse the spinach and drain it, dump it in a pot with a lid and steam until all wilted and cooked.  There is no need to add additional water to the pot as there is enough water clinging to the leaves to do the job.   Then dump it into a big strainer and let cool some.  You will then need to squeeze out the extra moisture with your clean hands until it forms a ball like the one pictured here.  If you use frozen spinach, just let it thaw and then squeeze into a ball to get the extra moisture out.  I like to use about a pound of spinach per pie to give it flavor.
Now here comes the super easy and super flexible part of this entire recipe!  

 Since a pie holds 4 cups of fillings, I came up with the recipe in this manner.  Take a 4 cup measuring cup and we will be filling it with ingredients.  This means there is no need to measure individual ingredients.  Take your spinach and plop in the bottom of the measuring cup.  Then crack open 3 eggs and place in the measuring cup.  From there the sky is the limit.  I put in a big hunk of onion, some feta cheese and some big hunks of cheddar cheese.  I was out of milk this time so I put some sour cream to give it creamy richness.  Add whatever seasonings you want (if any, the cheese in this case adds enough salt) and then fill the cup to the 4 cup mark with milk.  In this case I added water in addition to the sour cream.  If you are unsure that the pie will set up, go ahead and add 1/8 cup or so of flour to the cup as well. 

Dump the whole lot into your food processor that you made the pie crust in.  I don't even bother to wash between stages.  It does not matter with this recipe.  Go ahead and just use it.  The little bit of flour left in the food processor from making the pie dough will not hurt the filling. 

Then just pulse the whole thing until it is finely chopped up.  Do not puree it!  You want it to have a little bit of texture.  See, wasn't that easy?  You don't have to grate cheese or onions or get all fussy about it.  It all mixes together and is chopped up perfectly.

Next just pour the entire thing into your pie crust.  Assuming that you did everything correctly, it should just fill the pie crust perfectly with no waste at all.   I measured slightly over 4 cups here but it all fit into the pie just fine.  Then I sliced some tomato and places a bit of feta cheese on top before placing into the oven.  

Preheat the oven to 400 and bake for 15 minutes and then turn down the oven without peeking at the pie, to 375 and bake another 45 minutes.  Depending on which ingredients you used, it might need a little more time.  Go ahead and take it out of the oven when a knife inserted in the center comes out clean and not coated with egg. 

This is best if you let it rest a bit before slicing and serving as it will firm up some.  If you try serving too soon, it might still be a little loose.  


I like this served with some fruit on the side.  It makes for a super simple dinner or brunch.  We add a variety of ingredients to this and this makes a great clean out the fridge type pie.  It really isn't a quiche but is kind of based on one.  Just let your imagination go wild with what you want to add.  The only rule is that you must use at least 3-4 eggs per pie, and you need something creamy added to it for texture.  I was thinking a Reuben pie might be good, by adding Swiss cheese, kraut and corned beef... I might have to give it a try and see.  It only takes minutes to make this with the food processor and you have no waste by using the 4 cup measuring cup to know you have just the right amount of ingredients to fill a pie.  

Sometimes when I make this people ask for the recipe.  There is no recipe, with the exception to the general rules I just highlighted.  When I try to explain I get the deer in the headlights look staring back at me sometimes.  I thought if I made a pictorial that it might help with some of the confusion.   It is really simple, and really tasty.  Now go forth and make yourself a simple spinach pie!  I know you can! xxxxxxxx