Saturday, March 9, 2013

Yarn Ahoy Matey!


About a week or two ago, this was all the worsted weight yarn I had left in the world.  What a sad state of affairs this was.  I worked hard to work down my stash and with this much left, there was not much left that I could make for a completed project.   Well now I have the jackpot!  I will not need to buy yarn again for a long time. 


About two weeks ago I started to buy yarn on sale at various places.  I kept going back to some of the discount stores and picking up colors that I liked here and there.  


It all was taking shape nicely don't you think?  But no... I could not get all the colors I wanted so I put in a big order for yarn on the internet.  


That arrived yesterday... 9 glorious pounds of yarn to complete my color selection with!  Oh, the ideas started to swim around in my head and I could not wait to compile this yarn with the other yarn so see the rainbow I had.  


I heard lots of cars and noise out front early this morning... I thought "What is going on out there"?  and I looked and it was a big garage sale at one of the neighbors houses.  The entire house is a big garage sale as they are retiring and moving to Vegas.  I saw someone come up the stairs with a big box claiming "I have 40 skeins of yarn here". and I RUSHED down the stairs only to find a room full of boxes of yarn.  I came home with all of this for only $27!   The acrylic yarn was only 50 cents a skein and the lambs wool was only $1 per skein!!  SCORE!  


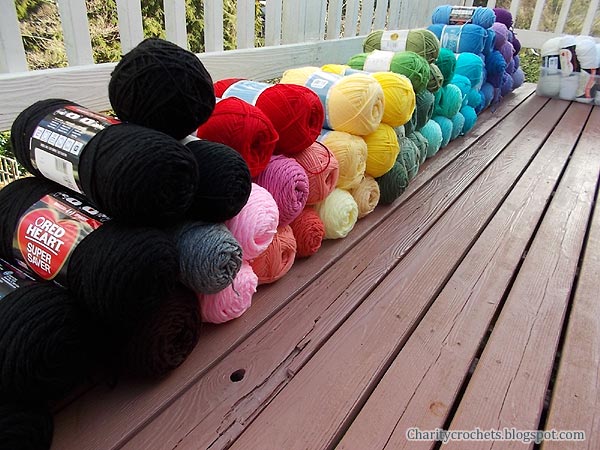
I then gathered all of my new yarn together and put out on the back deck.  I began to sort by reds, pinks, oranges, yellows, blues, greens, purples and on and on...  It is a rainbow of yarn sitting together.  The truth of the matter is... I don't even know how many skeins I have now.  


There are so many colors to make so many wonderful things with as these are all brand new skeins of yarn, never touched.  I have so many ideas dancing around in my head looking at this. 


And last but not least, the sun came out and it is beautiful and warm and breezy.  I was able to put our washing out this morning, meaning tonight is going to be a great night to climb into bed with fresh & crisp line dried sheets.  I will be super happy smelling them and dreaming of all the things I can make with all that yarn.

I do not need to purchase any more yarn for a long time again, that is... until my basket ends up with the last of the yarn with not enough to make much of anything again... I suspect that will be a year or two from now :)  

I am a very happy girl!  xxxxxxxx


Tuesday, March 5, 2013

Krochet Krystal Daisy Square, and planning my next project

Today I finally got busy on my Krochet Krystal charity square.  I downloaded the pattern a few months back as I want to make a groovyghan.  I know that for sure, this is one of the squares I want to use.  It is such a great cause too!


Here is my first practice square.  I am going to use up all the little balls of yarn that I can and practice on a few more.  Then, I will be sending them off to the pattern designer.  The pattern is free, but she only asks that you make her one square as payment with either black or white as the background color.  You can go here and see how to download this free pattern.   

It is a little bit fiddly to work up as you are using two yarns at once and going in the round.


But do not fear!  When you join her yahoo group, she will send you links to the video content if you get stuck on any of the parts.  I do think that it needs a little practice.  This is my first square that I uploaded here of this pattern and I think I could do better.  Once I make a few more, and use up some of my little scraps on it, I should have it down well enough to make some for a blanket. 

Once I get these perfected, I will be making a groovyghan, and you can see them here.   I am still undecided on exactly how I will make my groovyghan.  I have more yarn arriving on Friday in addition to the big shopping spree I went on last week, as I was running out of yarn. 

It is a fun little square to make.  I hope you enjoy making them if you download the pattern.  I think it is such a great thing, because what she is doing from designing this pattern.  A lot of people that need blankets get some beautiful ones, from squares sent from all over the world.  They are colorful and very pretty as is.  

Until next time... xxxx


Monday, March 4, 2013

Trinity Ripple Pattern/Tutorial thingie.


Hello, I thought I would break up my post from when I did the big reveal on this blanket as it would have made for a very long post otherwise.  Here is a tutorial on how I made the blanket.


Each ripple is multiples of 14 stitches and then + 3 at the end to start the next row.  I also included here how to make a ripple blanket with deeper ripples or softer waves.   All you have to remember is to start and end every row with a 3 chain stitch which counts as your first double crochet on every row through the blanket. Instead of counting for the foundation chain, I just crochet a long chain about one and a half times the width I want, and keep making the first row until it is as wide as I want.  Then I cut off the extra leaving about a 6 inch tail, and carefully unravel that tail until I get to the foundation stitch and carefully weave it in to secure it.  I can't count how many times I have had to rip out projects because I got the foundation chain wrong with counting.  It never fails, that the phone should ring or someone talks to you, and your get distracted... I found this is the no stress easy way.   If you want to count you still can, it is up to you.  Just count in multiples of 14 (if you are making the blanket like I did) and then add 3 more stitches which counts as your first double crochet and start the next stitch the 3rd foundation chain in from the end.  

Say for instance you want to make the ripple deeper and make 6 double crochets instead of 3 between increases and decreases.  Start with the number 8 to allow for increases and decreases and add to that 8.  You will need to times the number you choose times 2. 

So let's do the math here... 2 x 6 = 12 + 8 = 20  so that would mean multiples of 20 + 3 for the first double crochet on the next row.  


If you would like to see it with a photo this might help you more.


You can alter a ripple pattern very easily to make it do anything you want.  There is only one rule and that is that you have to decrease and increase the same amount, and the number of stitches you put in between those increases and decreases is up to you.  Just make sure they are the same too.  

I made the end of the blanket straight so that I could put a border on it that was ruffled and fun.  This is how I did that. 


Please note:  This above image only works for the increases and decreases I made on the blanket and drawn in the pattern earlier in this post.  If you add or decrease stitches in the center, you will need to adjust the stitches and it may not work for really dramatic ripples.  But for the trinity (3 decrease stitches, 3 double crochet, and 3 increase stitches) you will want to do what I have graphed in this picture.


And now on to the happy ruffle edging. My grandmother used to put this border on all her towels back in the 1920s.  It is so festive and fun isn't it? 


It is basically making a cluster of 7 double crochets in one space, and skipping over 2  double clusters of double stitches (4 double crochet stitches total) and securing it with a slip stitch, then skipping 2 more double stitch cluster stitches (4 double crochet stitches total), and making another 7 double crochets again, and doing this all the way around.  This will make a secure scallop but it does not ruffle.  Let's move on to the next part to see how to make it ruffle shall we?


Just be sure to start the picots on the edges (which makes it ruffle) in each space.  slip stitch, chain 3, and in the next space do it again and again until you go all the way around the blanket. 

I hope you enjoy this free pattern and play with it some.  I hope it inspires you to make whatever kind of ripple blanket you want, whether it is with deep dramatic wavy ripples, or tiny little subtle ripples.  

Until next time.... xxxxxxxxxxxx


The big reveal! Happy Scrappy Trinity Ripple Blanket


I love my new ripple blanket, yes I do!  I ended up making it way bigger than I intended.  One of these days I swear I will learn to make a lap throw sized blanket for here at home.  It measures 80 x 77 inches with the border on it. 


It is such a happy blanket with all the waves of color dancing around.  I used up a lot of little scraps in various colors.  There are a lot of shades of color that just do not show in these photos.  I grouped together the yellows and blues and so on and so forth and started darker to lighter but the color variation is slight enough to give it texture in person but does not shine in the photos. 


The blanket is near a perfect square with it only being 3 inches longer than it is wider.  This means that depending on how I feel, I can put it either direction on the bed.  I can have the stripes going across, or I can have them going down.  Switching it back and forth helps keep the boredom away. 


Here is a close up so you can see the texture of the blanket.  I love that the rows have all this texture to it.  It just makes the blanket all that much more!


I put a happy border on it with ripples all around.  This blanket just needed that as a plain square border just would not do.  This way the outside sort of mimics the inside of it all.  

It was a really fun project which just about cleared out a good share of my yarn scraps.  I have a few more dark colors to use up, but things are getting lighter and brighter in my stash...  

I thought I would break up this post so it would not be so long.  I am calling it my "Trinity Ripple" blanket because the stitches were all done with the magic number 3.  If you would like to know how to make this pattern, I made graphs for you to do just that.  It includes the ripple pattern, how to square off the wavy edge and the border pattern.


I hope you enjoy the blanket as much as I do.  xxxx


Sunday, March 3, 2013

Relaxing Sunday... and Ripple Sneak Peek

Today was a very relaxing Sunday.  I got up this morning and put up a quick batch of rootbeer. You can see the post here.   I made a quick tutorial for anyone interested in how to make it.


I ended up going to the movies with a friend this afternoon.  It was a cute movie named "Jack The Giant Slayer".  When exiting the movie theater this was the view.  I love the view from this theater in town.  On a clear day there are clear blue skies and mountains capped with snow all around.  It is a stunning vision to be seen.  Even though it was overcast today, the view is still beautiful don't you think?


After dinner tonight I was able to get a bit of hooking time in.  I am only showing you a limited sneak peek at my ripple blanket.  I think you are going to like it. For now you get this limited view that was shot with a flash on the camera as it is dark now.  The flash drowns out all the texture... Which is kind of fun because you are going to love it when I get a chance to take appropriate photos.


I can't wait to write up the pattern and take lots and lots of photos in a few days.  I am excited to show it off.  Until then, this is all you get (Yes, I am such a tease)

OK, off to watch "Vikings" on the history channel.  I have not viewed this series before but already I am loving it.    Ta!


Old Fashioned Rootbeer Soda Tutorial.


Have you ever wanted to know how to make your very own homemade rootbeer the old fashioned way?  Or how about cream soda or any other flavor?  The way they did way back then before forced carbonation and made simply without all the added chemicals, and preservatives and high fructose corn syrup, etc.  

Recipe:  20 cups of water
2 1/2 cups of sugar
2 Tablespoons of Rootbeer extract (available at your local brew shop)
1 Tablespoon of Vanilla extract
1/8 teaspoon champagne yeast (available at your local brew shop, and do not whatever you do, DO NOT use bread yeast like some recipes ask for.  It will make it taste terrible and like, well.... bread and yeasty.  Champagne yeast does not alter the flavor.  A small $1 packet will last for many batches.  I keep it stored in the freezer in a ziplock bag once it is opened, and keep using it till it is gone)


Begin by putting the sugar into a big pot along with the water.  Put on the stove and bring to a boil.  Once it reaches a boil, I put a lid on it to help keep the water from evaporating out.  Once it is boiling, set the timer on your stove for 10 minutes and let it roll.  

While it is going, scrub out the bottles you want to use.  If you are a beginner at this, I highly suggest using plastic liter bottles with a screw on lid instead of the beer bottles I am using.  The reason for this is because with the plastic bottles once they are carbonated you will be able to tell by squeezing the bottle and if it is firm, it is probably ready... but I am getting ahead of myself here.   You will need to sanitize your bottles.  You can soak your bottles in a sink full of water along with a couple tablespoons of bleach for about 1/2 hour, and rinse several times with hot hot water... The other option is to use something called "Star San" as bleach can leave behind a nasty flavor and you can re-introduce bacteria with your rinse water.  I mix  1/2 teaspoon of star san in 1 quart of water  (A batch of star san will last several weeks so you can keep re-using it for more batches.) .  I put some of it in a spray bottle and the rest into my nifty bottle washer.  You place the bottle on it, and pump it down a few times and it sprays the sanitizing solution into the bottle and drains back into the bowl below.  Otherwise you will need to pour some in, shake it around, and pour back out into a container to re-use. Once I have sanitized all my bottles I place them into a bucket to drain until I need them to fill later. 


Once your water has boiled for 10 minutes, place it in a sink full of cold water to help it cool faster.  Fill the sink first so no un-sterile water contaminates the pot by splashing in while filling the sink.  This will help it cool faster (yay! thermodynamics). Take a sanitized measuring cup (I usually spray everything with the sanitizing solution a few minutes before hand and keep on a clean and sanitized plate) and dip out about 1/2 cup of the sugar water.  Once it reaches about 80 degrees (check with a sanitized thermometer) add 1/8 teaspoon of the champagne yeast and wait a few minutes and give it a good stir with a sanitized spoon.  Once the pot of sugar water cools to 80 degrees pitch the yeast solution into it and add 2 Tablespoons of rootbeer extract ( I like gnome brand!) and 1 Tablespoon of vanilla extract.  Give this a stir with a long sanitized spoon being careful not to touch the rootbeer with your hands.  


Usually I would use a brewers bucket with a spout and racking cane and hose, but for this tutorial I used equipment that the average person would have in their kitchen which is a pitcher and a funnel.  Make sure they are sanitized and fill the bottles using the funnel and pitcher.  You will need to re-fill the pitcher several times.  I take the pot out of the sink and dry off with a towel on the outside before filling the pitcher to ensure no bacteria filled water droplets end up in your rootbeer contaminating it. Fill your bottles and leave about an inch head space.  I cap with a capper, and bottle caps for beer bottles that have been soaked in the sanitizing solution first, and after I give the capped bottles a good rinse and dry off with a towel,  I label them.  I just use simple masking tape and a sharpie marker.  I usually end up with 12 - 13 bottles of soda, depending on how much I spill when filling the bottles. 

I realize most people will not have a fancy beer bottle capper and until you have been doing this for a while, I highly suggest just using some recycled plastic liter bottles with screw on caps.  Let them sit out at room temp for a few days.  In my house it is usually about 3-4 days.  The reason why I suggest for the beginner to use plastic bottles is that once the yeast does it's job, you will be able to squeeze the bottle with your hand to tell if it is firm.  If it is firm and carbonated, then you can put it in the fridge to crash the yeast.  At my house since I use beer bottles, I wait 3 days and open one bottle and drink it to see if it is carbonated enough.  Sometimes I need to let it go another day or so.  

Now the important part!  DO NOT store these at room temp once they reach carbonation.  The yeast will continue to eat the sugars and build more carbon dioxide (the fizzy stuff) and will eventually build so much pressure they will become bottle bombs and explode and make a huge mess in your kitchen (or where you store them!).  

Once the soda is at a good carbonation level you will need to crash the yeast.  This is where your ice box is key.  Put the whole batch into your fridge and let sit for a day or two.  The yeast will get too cold to work anymore and sink to the bottom of the bottle and go to sleep and stop building CO2 and pressure.  When you serve your soda, just pour into a glass leaving behind about 1/2 inch of soda where all the yeast is contained.


Congratulations!  You just made some homemade rootbeer.  If you want to make cream soda, just use vanilla extract from your spice cupboard (2-3 Tablespoons depending on taste, just play with it).  You can go to your local brew shop and they have a plethora of old fashioned flavors you can use too.  

Now wasn't that simple?  You will never again need to buy soda again and you can have it natural style without all the additives and nasty chemicals like in commercial soda.  A bottle of flavoring lasts for several batches.  2 Tablespoons is 1 ounce.  Depending on the size of the bottle extract you buy, you can make quite a few batches.   If you are really adventurous you can even boil down things like blackberries and filter out the seeds and go completely natural with your soda flavors.  Just have fun and experiment with your own creativity.  You can boil some grated ginger root along with some lemon rinds and juice for ginger lemon too.  If you purchase flavoring for baking, you can even use those flavoring extracts.  The sky is the limit! 

Now go forth and have some soda making fun!  You don't need one of those kits to make soda that uses chemical filled syrups and CO2 chargers.  All you need is some flavoring, either homemade (do a google search for homemade ginger ale for instance) or you can purchase old fashioned flavor extracts from a brew supply place, or go to amazon.com and buy some.  

Just have fun!  And I hope you enjoy your rootbeer!  


Thursday, February 28, 2013

Ripple blanket, it is a marathon, not a foot race.


I am happily on my way with the border of my ripple blanket.  I am can hardly wait to show it off to you dear reader.  I have a few more rounds to bring it together.  It will be a while before I do my "Big Reveal" moment because I really want to write out a pattern and diagram so anyone that wants to make one can, including how I squared it off and the border.  This is a very scrappy blanket and is using up the end of my yarn stash.  I have almost depleted my yarn for blanket making.  The edges of this border will be far more different than what is pictured.  The pattern is about to change soon, and have loads of waves and fun... Stay tuned!  All I can say about it is... It is copied from the towel edging that came from my grandmother.  If this is any clue to tell you about it, my mother is 87 years old, and the design is from the 1920s with my own personal twist and changes.  When her mother was alive she crocheted a border on every single towel, bed sheet, pillowcase, etc. that she could.  She used a fine needle and fine thread.  There was no textile that was safe from a crocheted lace border.  What I am about to make, is copied from one of her towels.  When grandma passed away her things (many of them) went into storage.  When my great auntie passed, we got all of them. To this day, there are a lot of lace and fine crocheted things floating around our home.  Oh to have all the borders on all bed sheets, towels and washcloths covered in lace now!  I admire her for doing so. 


As you can see, the plastic laundry basket is getting pretty empty.  It is nearly at the bottom and this means I am almost out of yarn.  This was the quest with making my last few projects.  I wanted to use up my yarn.  I had some yarn I purchased and some that I inherited and over the last several projects I did my best to use them up.  Some of the colors were dark, and some were light.  I wanted to use them however so I could start fresh, with a new stash...  As much as I look at yarn like I look at a box of crayons in the way that a child does, my box of crayons was not always what I would choose.... But I progressed, and pushed through to add them and use them and make them work, for I feel that even those odd colors can add a lot of dimension to a project.  But, loving color as I do, even the colors I would not purchase have a place in little spots to add highlights and depth like an artist does with paint.  


Over the last week or two, I started adding to my yarn "hoard".  I went to my local "Mega Low Mart" (if you don't know to what I refer I apologize... but that store is within walking distance to me and one of the few places to purchase acrylic yarn.  I get a 2 mile walk in which is good) and bought a few skeins here and there.  I went to my local Joanne's fabric store as well, and bought more yarn.  It is a mixture of Red Heart Super Saver, Vanna's Choice and Caron Pound of Love, and Pound of Baby Yarn.  


I have a few more colors to go!  I need some more salmon type colors and lipstick colors and yellow colors to complete the collection.  Soon I will have a "crayon box" to choose from that I actually like and love.  This excites me to no end... Imagine!!!  A box full of "crayons" to color my world with and most all of them are colors I purchased because I like them.  It to me is like a brand new box of crayons, before the paper has been peeled.  So exciting and so many possible things to make.   I do have a few random skeins left from previously not pictured that are still dark and such but I will still use them randomly to add shadows and depth.  Heck, all colors do have their place, it is all how you use them.

It was all in all a successful day however, as I did damage to my pocketbook, I also loaded up on more fiber once again.  That is a great day!  Colors are dancing around in my head already :)  

Until next time... xxxxxxxxxxxxx